Iteaduino Microcontrolador BT Bluetooth Compatible con Arduino

Ahorre $22.41
iTead StudioSKU:RB-Ite-124
Número de fabricante: IM120411006

Precio  :
Precio de oferta $9.61 Precio regular $32.02

Envío calculado al finalizar la compra

No se aceptan devoluciones de artículos de pedido especial y en liquidación, excepto cuando se encuentran defectuosos, en cuyo caso el producto puede repararse o reemplazarse a discreción de RobotShop.

Pagos y Seguridad

American Express Apple Pay Diners Club Discover Meta Pay Google Pay Mastercard PayPal Shop Pay Venmo Visa

Su Información de Pago se procesa de forma segura. No almacenamos los datos de la tarjeta de crédito ni tenemos acceso a la información de su tarjeta de crédito.
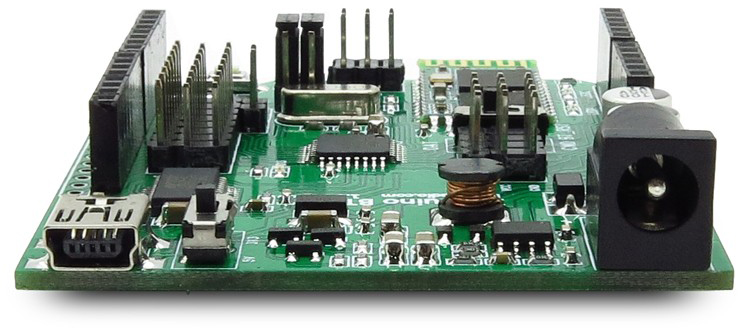
Descripción

Diseñado para comunicación Bluetooth
Basado en Arduino Duemilanove
Selección de voltaje de operación de 3,3 V/5 V
Frecuencia máxima: 16 MHz

El Iteaduino Microcontrolador BT Bluetooth Compatible con Arduino es una placa Arduino compatible con un módulo Bluetooth maestro/esclavo HC-05. Se basa en Arduino Duemilanove, 100% compatible con su programa existente y escudos, pero con la función inalámbrica bluetooth. El consumo de energía es de aproximadamente el 50% de las placas Arduino originales.


Iteaduino Microcontrolador BT Bluetooth Compatible con Arduino – Haga clic para ampliar

Características
Compatible con alfileres, agujeros y dimensiones Arduino UNO / Duemilanove
Entrada externa de amplio rango desde 7-23 V DC
Pines de salida para sensor y servo
Selección de voltaje de operación de 3,3 V/5 V


• Tamaño de la placa: 75 mm x 57 mm
• Peso: 45,00 g

Archivo ZIP
Documentación

• Microcontrolador: ATMega328P
• Capacidad de RAM: 2K
• Capacidad de FLASH: 32K
• Nivel de operación de E/S: 3,3 V; 5 V
• Versión: 1.1

Recursos externos
- Inalámbrico integrado
- Interfaz de bloques electrónicos

Fuente de alimentación
- Externo 12 V
- Externo 24 V
- Externo 7 V
- External 9 V
- USB 5 V

• Arduino IDE> Tipo de placa
- Elija Arduino Duemilanove con ATmega328 desde el menú Herramientas> Placa en Arduino IDE para cargar sus bocetos.

Customer Reviews

Based on 3 reviews
0%
(0)
100%
(3)
0%
(0)
0%
(0)
0%
(0)
A
ALEXEY
It is difficult to make it work, but it works

It was very difficult, but I eventually made it work :) The problem was about 1) the documentation, and 2) the device version difference. The documentation is a disaster. Besides, there are at least two versions of the Iteaduino: v.1.0 and v.1.1 (I don't know anything about others). They are different, and so they require different jumper settings. This device works fine, provided that you use the correct settings. Here is what I discovered. 1) First of all, to load a sketch you MUST NOT use "Arduino UNO" setting from the Tools > Board menu in the Arduino IDE. The board looks like UNO, but is can't be programmed like UNO! Choose "Arduino Duemilanove w/ ATmega328" instead. 2) Look at the version of your device on the back side. It must be 1.0 or 1.1. You should use different jumper settings to program the device depending on the version of it. 3) The device has three working modes: a) PC connected to ATmega328 via USB - a "normal" Arduino mode. You load sketches and use a Serial port over USB in this mode. b) PC connected to HC-05 chip via USB - you change HC-05 Bluetooth chip settings using "AT" commands. c) PC connected to ATmega328 via Bluetooth - that's why you bought this board. You can't load sketches, but you can use a serial connection over Bluetooth to make an external Bluetooth device (PC, cell phone etc.) to communicate with your Iteaduino sketch program. 4) In mode a) you should use the following jumper/switch settings: jumpers: remove all jumpers; switch: any position, but it is more safe to set it to DAT. And when you upload a sketch, don't forget: it is a "Arduino Duemilanove w/ ATmega328", not "Arduino UNO". 5) To succeed in mode b), you must first UPLOAD A SKETCH which doesn't use a "Serial.begin()". You may use the simplest "Blink" sketch example from Arduino IDE. Of course, you must use mode a) described above to do it. Every time you want to change HC-05 settings you must first switch to mode a) and replace your current sketch with "Blink". (You can avoid sketch reloading if you have an option to make your sketch somehow to skip the Serial initialization.) I believe that this requirement is an Iteaduino BT design issue. In mode b) you should use the following jumper/switch settings (set them when the power is OFF!): jumpers: v.1.0: position "B". v.1.1: position "A". switch: position CMD. Connect a USB cable, open a serial terminal, set speed to 38400 and configure your device using AT commands. Every command should be terminated with CR and LF in this order (you may just use "Both NL & CR" option in Arduino IDE terminal window.) A description of of the AT command set can be found here: http://www.linotux.ch/arduino/HC-0305_serial_module_AT_commamd_set_201104_revised.pdf IMPORTANT: To successfully work in mode c) you sketch must initialize Serial to the same baud rate your HC-05 device uses! The HC-05 baud rate can be set using AT+UART command. I am not sure what value it is reset to by AT+ORGL. The HC-05 command spec I referred above says that it is 38400, but the same spec says that the default value of the baud rate is 9600. In my case, as I received the device, the initial baud rate was 9600. Note that changing the baud rate settings affects only the rate in mode c) but doesn't affect the rate in this configuration mode b): the last is still 38400 (provided that you switch modes and set jumpers when the power is OFF.) See more details by the link to the spec above. 6) In mode c) you should use the following jumper/switch settings (set them when the power is OFF!): jumpers: v.1.0: position "A". v.1.1: position "B". switch: position DAT. This is it. Hopefully I didn't forget something important. Good luck :)

C
Cy
Worked as planned

We used 20 of these to build a prototype of a medical device. They all worked and arrived super fast even though it said three were on back order, they all arrived together.

A
ALEXEY
It is difficult to make it work, but it works

It was very difficult, but I eventually made it work :) The problem was about 1) the documentation, and 2) the device version difference. The documentation is a disaster. Besides, there are at least two versions of the Iteaduino: v.1.0 and v.1.1 (I don't know anything about others). They are different, and so they require different jumper settings. This device works fine, provided that you use the correct settings. Here is what I discovered. 1) First of all, to load a sketch you MUST NOT use "Arduino UNO" setting from the Tools > Board menu in the Arduino IDE. The board looks like UNO, but is can't be programmed like UNO! Choose "Arduino Duemilanove w/ ATmega328" instead. 2) Look at the version of your device on the back side. It must be 1.0 or 1.1. You should use different jumper settings to program the device depending on the version of it. 3) The device has three working modes: a) PC connected to ATmega328 via USB - a "normal" Arduino mode. You load sketches and use a Serial port over USB in this mode. b) PC connected to HC-05 chip via USB - you change HC-05 Bluetooth chip settings using "AT" commands. c) PC connected to ATmega328 via Bluetooth - that's why you bought this board. You can't load sketches, but you can use a serial connection over Bluetooth to make an external Bluetooth device (PC, cell phone etc.) to communicate with your Iteaduino sketch program. 4) In mode a) you should use the following jumper/switch settings: jumpers: remove all jumpers. switch: any position, but it is more safe to set it to DAT. And when you upload a sketch, don't forget: it is a "Arduino Duemilanove w/ ATmega328", not "Arduino UNO". 5) To succeed in mode b), you must first UPLOAD A SKETCH which doesn't use a "Serial.begin()". You may use the simplest "Blink" sketch example from Arduino IDE. Of course, you must use mode a) described above to do it. Every time you want to change HC-05 settings you must first switch to mode a) and replace your current sketch with "Blink". (You can avoid sketch reloading if you have an option to make your sketch somehow to skip the Serial initialization.) I believe that this requirement is an Iteaduino BT design issue. In mode b) you should use the following jumper/switch settings (set them when the power is OFF!): jumpers: v.1.0: position "B". v.1.1: position "A". switch: position CMD. Connect a USB cable, open a serial terminal, set speed to 38400 and configure your device using AT commands. Every command should be terminated with CR and LF in this order (you may just use "Both NL & CR" option in Arduino IDE terminal window.) A description of of the AT command set can be found here: http://www.linotux.ch/arduino/HC-0305_serial_module_AT_commamd_set_201104_revised.pdf IMPORTANT: To successfully work in mode c) you sketch must initialize Serial to the same baud rate your HC-05 device uses! The HC-05 baud rate can be set using AT+UART command. I am not sure what value it is reset to by AT+ORGL. The HC-05 command spec I referred above says that it is 38400, but the same spec says that the default value of the baud rate is 9600. In my case, as I received the device, the initial baud rate was 9600. Note that changing the baud rate settings affects only the rate in mode c) but doesn't affect the rate in this configuration mode b): the last is still 38400 (provided that you switch modes and set jumpers when the power is OFF.) See more details by the link to the spec above. 6) In mode c) you should use the following jumper/switch settings (set them when the power is OFF!): jumpers: v.1.0: position "A". v.1.1: position "B". switch: position DAT. This is it. Hopefully I didn't forget something important. Good luck :)

Estimar envío

También le puede interesar