Manual - Vendor Account Set Up
Important reminders
- Orders must ship within 72 hours unless you specified it was a special order
- All orders shipping to Canada, USA, Europe and the UK must ship duty/taxes free (DDP)
- You may communicate with the customer at any time within the vendor portal
- Only shipped orders will be paid. The payment will be held until the order is marked as shipped. Once marked as shipped, it will be included in the next payment run (bi-monthly, minimum payment amount 300$).
If, for any reason, you are unable to ship this order, please inform the customer and let us know by sending us an email to marketplace@robotshop.com
Setting Up Your Vendor Account
Note: please login to your vendor account here once your user has been activated:
https://marketplace.robotshop.com/
1.1 Summary tab
- Start by validating your information (address etc.)
- If your product is built on demand or takes longer than 72 hours to ship, you may select the special order option and enter the delay for shipping.
- At the bottom of the summary tab, Check mark the RobotShop stores on which your products will appear and be available for Sale. (If selected):

N.B To Add European Websites and the United Kingdom, more information is required:
Due to laws in these Countries, you must follow directives, See section 1.5 Taxes. Once completed correctly, You will be able to checkmark/Add the European/United Kingdom websites.
Important information regarding our US website: By choosing the US website, you will make your product available internationally. If you wish to restrict sales within the USA only, please enter the restrictions in the Country restrictions tab.
1.2 Store Information
This is where you will describe your company/brand and add your logo and company banners.
Click on Edit store information:

Then, include your logo and desktop banner*.
*You only need to add the desktop banner (1695x340px). We no longer need to add a mobile banner.*
**No Text or URLs will be accepted on the banner (Unless it is the name of the Brand only)**
Here are the required dimensions:
Logo: 200 pixels large x 150 pixels high. Upload your logo in PNG format on a transparent background.
Banner: 1695 pixels large x 340 pixels high
See photo examples below:
![]()
Final results should look like the pictures below:

Logo Example:
Banner Example:

*** If you do not see the images that you have just uploaded, please refresh your web page
About us is the section where you will write a sentence that best represents your brand and/or include your company's slogan/mission/motto.
You may also translate this information into French, German, Dutch and Spanish if you are selling your products in different languages also. You can choose the default logo, and banners for other languages and do not need to upload these again.
1.3 Warehouses
In this tab, you will enter the different warehouses you will ship from. Simply click on ‘’Add New warehouse’’ Enter the complete address and indicate with a Check mark if this warehouse is for Europe or North-America or both.
At the moment, you cannot add more than one warehouse per Region.(Example: 2 warehouses in North-America)


1.4 Shipping
***All orders shipping to Canada, USA, Europe and the UK must ship duty/taxes free (DDP)
There are 2 types of Shipping:
Fallback Shipping + Standard Shipping Methods

1.4.1 Fallback shipping method
You must enter your fallback shipping method (default) for each currency you want to sell, this is mandatory. Once created, the fallback shipping method cannot be modified. **The Fallback shipping method is a shipping default price in case of a shipping area not listed in your shipping options. It is needed to make sure that you have a shipping method for every Country that you ship to. This will prevent customers from having free shipping for any countries that do not have specified shipping fees.
You may also add country restrictions when creating the product and either include/exclude countries in which you do not want to ship in per product when listing the products:
In Fallback Shipping Section Click on:

To add Fallback Shipping prices Click on:

Repeat for EACH Website:

Click: Save shipping method rate
NOTE: Customers will Not see the fallback shipping method as an option if the standard option covers the region the order is shipping to.
Once the fallback shipping method is set, you must add the shipping method of your choice depending on size, weight, and location. If you do not add another shipping method, the fallback shipping method will be used by default.
Please note that it is not possible to change a shipping method to a fallback shipping method after it has been created.
1.4.2 Standard Shipping Method
In the Standard shipping Methods section , click on: Add new shipping method
Name your shipping method:
- If you ship using different shipping methods at the same rate, please name your shipping option as ‘’Standard shipping’’.
Simply fill in the information and choose the website (Country) this shipping applies to, do not forget to click on ‘’shipping method active’’ in order for the shipping method to be activated:

Click on Add new rate (to add shipping prices)

Click : Save shipping method rate
To Add additional shipping options Example: 2 day shipping REPEAT the step in Standard shipping methods, by duplicating the Add new shipping method + Add new rate for each website you wish to offer shipping options.
1.4.3 Country Restrictions (vendor profile)
You can add a shipping restriction directly to your vendor profile.

1.4.4 Country Restrictions (Category Products)

How do restrictions work:
You can exclude a country only (which will restrict the complete country) or be more specific by adding states, provinces or regions. This is all done on the Country Restrictions tab. You can choose to override the restrictions in your vendor profile on one specific product.
You may also include only the countries in which you want to sell in.
Important information regarding the USA:
When shipping in the USA, customers from Alaska, Guam and Hawaii will be able to order as well. Please adjust your shipping method accordingly. You may choose the USA and exclude those states in the restrictions tab.
1.5 Taxes
RobotShop is the tax facilitator
Marketplace Facilitator Tax is the concept that Marketplace Facilitators are responsible for collecting and remitting the state sales tax on retail sales made by Marketplace Sellers on behalf of the Marketplace Seller.
If you must charge taxes in certain countries, you must add them here:

You are responsible for charging the correct taxes except for the states and countries where RobotShop must collect taxes for you.

For taxes managed by you, RobotShop will provide the tax amounts along with your payments. It is your responsibility to remit the taxes to the proper authorities. Tax reports will be available in your RobotShop Vendor account.
Useful link USA:
Useful links Canada:
1.6 Selling in Europe and the UK
Change to the European tax (VAT) July 2021
Please note that as of July 1st 2021, modifications to the current European taxation system will take effect.
All Vendors must provide a valid VAT number as well as a warehouse address within Europe in order to be able to sell on the European market.
The following websites will automatically be restricted in your vendor account: (If criteria not met)
- https://eu.robotshop.com
- https://eu.robotshop.com/fr
- https://eu.robotshop.com/de
- https://eu.robotshop.com/es
- https://eu.robotshop.com/nl
In order to remove the restrictions, make sure to enter a valid VAT number as well as a European warehouse address.
Useful link Europe:
Changes to selling In the United Kingdom - (Since Brexit)
Please note that in order to sell in the United Kingdom A valid Vat number and EORI number is required, you must indicate these numbers in the Tax section of your vendor portal.
The following websites will automatically be restricted in your vendor account: (If criteria not met)
Useful link United Kingdom:
1.7 Financial information
If this tab has not yet been filled, please make sure to enter your bank details in order to receive your payments every two week (minimum payment amount 300$).
If it has already been filled by one of our staff members, please review the information and make the necessary corrections if needed.
1.7.1 Commission invoices
In order to view your commission invoices, you must go on the Reports tab which can be found on the left hand side menu of the homepage:

You will then see the option ‘’Commission invoices’’, simply click on it to access all your commission invoices:

1.7.2 Finances
In order to access your account balance and detailed information on transactions, click on the finance tab on the left hand side menu:

You will then have access to more detailed information as shown below:

1.8 Submitting the vendor profile for approval
- Once the information in the account is completed on all tabs, click on submit.
- The account will then change status and be in waiting for approval (if the status is incomplete, please review all the tabs, you probably forgot some mandatory information)
- Once it is in waiting for approval, a member of our team will review and approve it and you will be able to add products (please go to point #2 for more details).
Users
You may Invite as many Users as needed, however, please note that they will gain complete access to your vendor profile.
2 Step by Step, Creating a new product
https://www.robotshop.com/pages/robotshop-marketplace-listing-policies
2.1 Create your product
- Click on Products on your left hand side:

- Click on Create new Product:

- Fill in all the information and click on save
2.2 Product tabs:
- Summary: Product information
- Prices: Product price per currency, price break available
- Images: Product images (No more than 10 images. No text)
- Country restrictions: If you do not wish to ship in certain countries this is the place to put the restrictions
- Attachments: All relevant documents such as datasheets, manuals etc.
- Descriptions: Product description that can be added in multiple languages. (Mandatory fields: Title, Product Highlights 1&2, and description)
- Inventories: You can manage and update your inventory.
*About the name: Include descriptive keywords/features to help customers find the product
2.3 Activating the product:
- On Status: Change to Activate

- Click on Validate then Save

*** For more information, please follow this link to the complete product listing guide:
https://www.robotshop.com/pages/robotshop-marketplace-listing-policies
3 Processing a new order
3.1 Confirm order
Confirm the order by clicking on the ''confirm order'' button as shown below:

Once this is done, the status of the order will change from ''ready to ship'' to ''processing''. Once the status of the order changes to ''processing'', the customer will no longer be able to cancel the order, this is why the first step is very important.
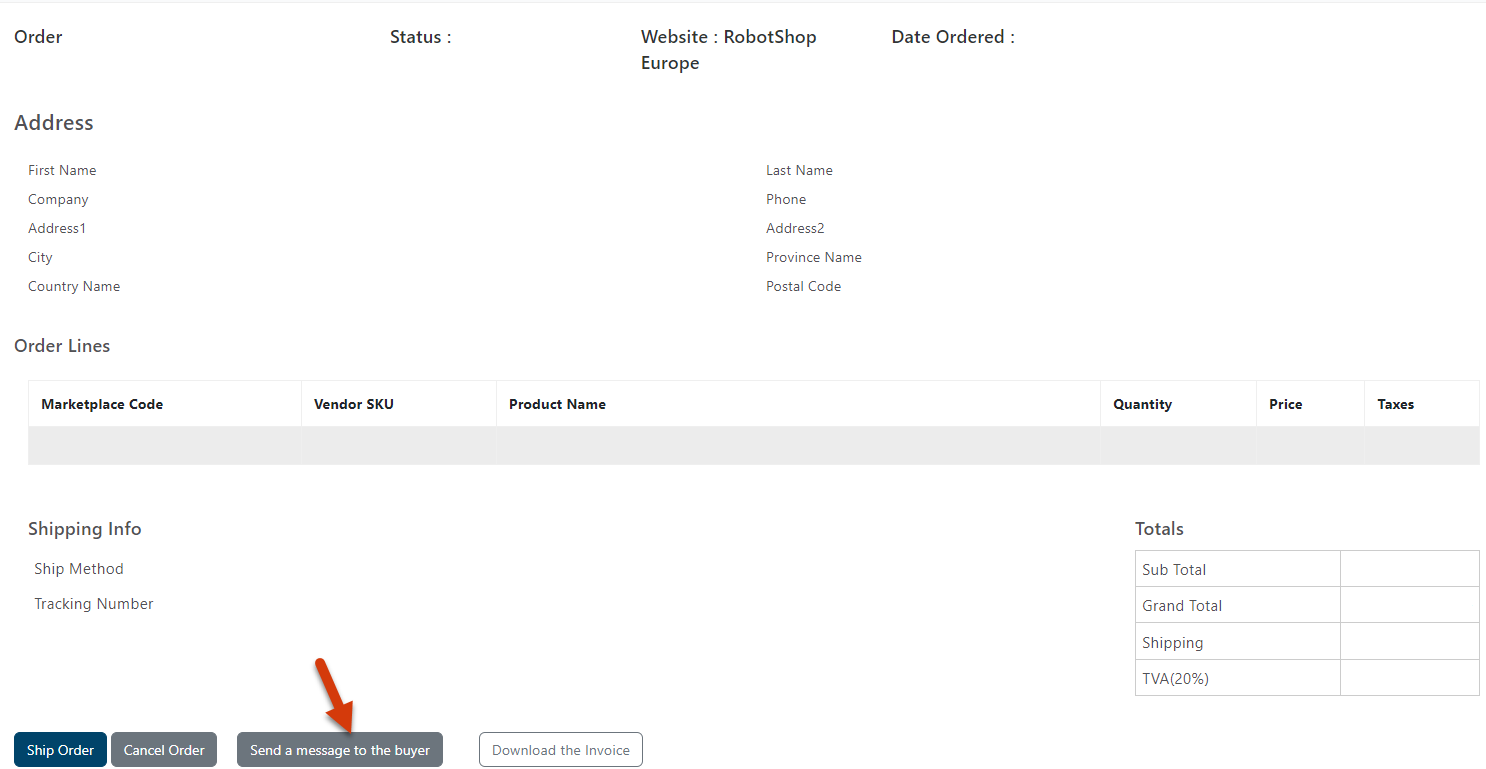
3.2 Ship order
You will click on the ''ship order'' button and enter the tracking information accordingly:


3.3 Important reminders
- Orders must ship within 72 hours unless you specified it was a special order
- All orders shipping to Canada, the USA and Europe must ship duty/taxes free
- You may communicate with the customer at any time within the vendor portal
- Only shipped orders will be paid. The payment will be held until the order is marked as shipped. Once marked as shipped, it will be included in the next payment run (bi-monthly, minimum payment amount 300$).
If, for any reason, you are unable to ship this order, please inform the customer and let us know by sending us an email to marketplace@robotshop.com
4 Vacation Mode
In the Account Setting → Summary, you will be able to find at the bottom of the page a Vacation Mode.↓ If your business is closed for several days/weeks. Please check the "Vacation Mode Enabled" box so customers know you are shipping after the date selected below.


The note on the website will be deleted once the date set on "End of vacation" has passed. Rest assured that customers will still be able to place orders while you are away.
5 Communicating with a Customer